Blogger’s new user interface is no longer supports Amazon Associates for Blogger

October 14, 2011
Its been months when Blogger lunches its new look and its cool to see this update. You can changes to this update by clicking to the "Try the updated Blogger interface" at the left side of your username or email on the top navigation bar of the older Blogger interface. But if you really like the older one, you can still use it by clicking to the "Switch back to the old interface" on the top navigation bar. Its cool right? But it has one thing that could be 'not okay' for bloggers that monetizes their blogs with Amazon Associates that was added lately on the Monetization Tab of Blogger. Lets see what it is!

In the older look of Blogger, Amazon Associates Tab was added to the Monetize Tab of Blogger and you can add your Amazon Associates ID to start using Amazon products to monetize your blog. But lately this Amazon Associates Tab is not responding properly when you are trying to change some preferences on it, even the Amazon gadget right next the post editor like what you see on the images below.


Why this is happening? One reason is because Amazon Associates Tab is no longer supported in the new user interface of Blogger. You can notice this on the two tabs of the new and old user interface, the Earnings Tab and Monetize Tab. These two tabs are same in functionality. Except that the new user interface don't have the Amazon Associates Tab, only the Adsense on Blog and Adsense for Feed menus. But in the old user interface these three menus are present. You can see these differences on the images below. 


But why the old user interface affected by this changes? This is because the new and old user interface uses the same database and mechanics of Blogger. This is the reason why the Amazon Associates Tab and Gadget on the old user interface are not functioning properly even thought the features are still on the old user interface. But we hope that this features will be available in the future for the new user interface of Blogger.

For now, we can use the old-fashioned way in using your affiliate links of Amazon. The 'copy and paste of your affiliate link and images' to your product keywords.

How to Fix the "Sharing is Caring" Icons in Community Blogger Template

November 20, 2009
This template is really cool. But weeks ago the 'Sharing is caring' button turns out having a problem. The reason why the icons does not appear because its using a free image hosting that was presently expired. To fix this problem you must host the Sexysprite.png image with your own hosting service. Or you can use my hosted Sexysprite.png image in this link: 

https://blogger.googleusercontent.com/img/b/R29vZ2xl/AVvXsEhg6-GB4oKh4l2enBJkTc9bLOwB5Axh7gO508wRCD2vGOWOHdkhZTHlg4zLThq3SR6jKsffkNK96c7HRHZ6ZdHXxAEi0WfHs2OmiX3JF4B8CQMln5ummbHxHJFLz4V_bIS5oeYkYuqUJtw/s800/Sexysprite.png

But if you prepare to host it with your own hosting service follow the steps below.
  1. Download the image here and extract it.
  2. In the extracted zip file select the Sexysprite.png image and upload it to your hosting service and get the image link
  3. Now, login to your Blogger account. Go to your blog Layout > Edit HTML and find the codes showed below:
  4. .sexy-furl, .sexy-furl:hover, .sexy-digg, .sexy-digg:hover, .sexy-reddit, .sexy-reddit:hover, .sexy-stumble, .sexy-stumble:hover, .sexy-delicious, .sexy-delicious:hover, .sexy-yahoo, .sexy-yahoo:hover, .sexy-blinklist, .sexy-blinklist:hover, .sexy-technorati, .sexy-technorati:hover, .sexy-facebook, .sexy-facebook:hover, .sexy-twitter, .sexy-twitter:hover, .sexy-myspace, .sexy-myspace:hover, .sexy-mixx, .sexy-mixx:hover, .sexy-script-style, .sexy-script-style:hover, .sexy-designfloat, .sexy-designfloat:hover, .sexy-syndicate, .sexy-syndicate:hover, .sexy-email, .sexy-email:hover {background:url('https://blogger.googleusercontent.com/img/b/R29vZ2xl/AVvXsEhg6-GB4oKh4l2enBJkTc9bLOwB5Axh7gO508wRCD2vGOWOHdkhZTHlg4zLThq3SR6jKsffkNK96c7HRHZ6ZdHXxAEi0WfHs2OmiX3JF4B8CQMln5ummbHxHJFLz4V_bIS5oeYkYuqUJtw/s800/Sexysprite.png') no-repeat !important;}
  5. After you find the codes change the red hightlighted link with your image link then click Preview if it is working and save.
NOTE: On the Edit HTML the quotation mark ' appears '&#39' with a semi colon ' ; '

    Update: 

    12/10/09: The images of the "Sharing is caring" that you about to download here is actually red in color and Community Blogger Template uses the same images except that it was blue. But in this tutorial we just need the Sexysprite.png image not the sharingsexy.png that is red in color. Community Blogger Template already uses a blue color "Sharing is caring" the sharing.png and we are not going to change that image, only the Sexysprite.png image. Below is an image to understand it more.

    Community Blogger Template

    September 22, 2009
    Click the image for Demo & Download

    Community Blogger Template is designed by BieTemplates. The wide screen layout of is great. The colors is very appealing and has different features. This template is suitable for portfolio project or magazine type blogs.

    Features:
    • Automatic thumbnail and read more
    • Bookmarks post icon
    • RSS Subscribe
    • Twitter update
    • Banner advertisement
    • Adsense ready
    • Three column
    • Three column at lower section
    • Navigation menu
    Need web hosting for your site?
    • Lonex Web Hosting: a web hosting that provide free domain registration, free setup and online website builder.
    • Ultra Website Hosting: you can create unlimited websites, provide free domain registration, and live support.
    • SunWebHost: a web hosting provider with no limits!

    How to directly embed the "Automotic Read More" option to your template?

    August 23, 2009
    Recently on my post Types of 'Read More' option in blogger blogs I had discussed that the Automatic Read More option uses a javascript and needs you to host it. Now we will do some trick to let our script embedded directly to our template that makes the script no need to host.

    What is the advantages of doing this trick? It saves our time to upload the script to our hosting account. Also, because the script is not hosted, it speeds up the page load of our blog. Does it means if I hosted the script my blog will run slow? No, this is only for a prevention. Why? It sometimes happen (the slow loading) when the host is some kind of busy like doing maintenance and some other related issues.

    How to do this trick? Just follow the instructions below: (FireFox Mozilla is the browser that was used in the illustrated images below)
    1. In your Dashboard, go to your template Layout, click to Edit HTML.
    2. IMPORTANT: Now before editing our Template, please make a backup of your template so if something wrong happen we can restore the original template just like it was before. To do this click the Download Full Template like illustrated below, (click the images below to enlarge)
    3. Template Backup and Save. Save Template
    4. Now download the automatic-read-more-script+postbodycode.zip, extract it and open the text file.
    5. Then search the following codes in your template, don't forget to expand your template. For easy search press Ctrl + F in your keyboard and type the code below (the </head> or <body>) and press enter.
    6. </head>
      <body>
    7. When you find it, copy the script below the Automatic Read More Script: in the automatic-read-more-script+posrbodycode.txt text file that you opened and paste it between the </head> and <body>.
    8. Then again search following codes below. For easy search press Ctrl + F and type the code below (I recommend the <data:post.body/>) and press enter.
    9. <div class='post-header-line-1'/> <div class='post-body entry-content'> <data:post.body/> <div style='clear: both;'/> <!-- clear for photos floats --> </div>
    10. When you find it replace the red highlighted code with the codes below the Post Body Code: in the automatic-read-more-script+posrbodycode.txt
    11. Now Save your template and your done.
    For the preview of what the automatic read more option that we just added look like check this blog homepage.

    You can also customize the size of the image thumbnails and how long the summary of your article will appear on your homepage. Just search our script that we embedded and find the couple of codes below and change the number highlighted in green for the image thumbnails size and the number highlighted in blue for the length of article summary for whatever would you like.

    </script>
    <script type='text/javascript'>
    var thumbnail_mode = &quot;float&quot; ;
    summary_noimg = 390;
    summary_img = 390;
    img_thumb_height = 120;
    img_thumb_width = 120;
    </script>

    If you have some expertise in editing CSS (short for Cascading Style Sheets) to change the appearance of the Read More option you can use the codes below:

    a.readmore { /*your prepared style here*/ }

    Types of "Read More" option in blogger blogs

    August 16, 2009
    I have seen many topics about adding "Read More" option in blogger and some of them are really difficult to follow. And I categorize them in two. One is the "expandable" and the other one is the "automatic."

    What is the "Expandable" type? "Expandable" type is the type that is little too tricky. It needs you to add some codes in your blog template in the upper and lower section of <data:post.body/>. It also needs you to add some other codes in the Post Template section of your blog settings under the Formatting area. It looks like this:

    Write summary here
    <div class="restofpost">Write rest of post here</div>


    or

    <span class="fullpost">

    </span>


    In the homepage all your post will be summarize. Also in the archive pages and label pages. But this type of "Read More" option has several disadvantages. First is it only summarizes the posts that you added the codes above. It will not apply to others that you didn't added the code. This type is not advisable if you already have 50 to 100 posts. Second is, it happen sometimes when you are editing your post content the codes get lost or erase and that needs you to paste the code again. It happens to me when I was using this type. You can get more information about this type of read more option here.

    What is the "Automatic" type? "Automatic" type is the type that once you set it up it don't needs you to add more codes in your post content. It automatically summarize your post in the home, archives and labels page. This type is recommended for bloggers that already have 50 to 100 posts in their blog because it automatically summarizes all your posts. This type is using a script called "summary-posts.js" and you need to host this script but you can use the script that was hosted in Quite Random. You can also find instructions of how to install the automatic "Read more" option there. (Browse to it here)

    In my next post I will teach you how to directly add the script right on your blog template to speed up the loading of the script.

    Unusual differences of Zinmag Remedy 2.0 to Zinmag Remedy

    August 10, 2009 Leave a comment
    Zinmag Remedy blogger template is a very professional looking template. The only problem is that if you don't have any knowledge about HTML editing it is not advisable to pick this professional looking template. It happens to me before, but usually being a blogger we need to adapt the trend.

    Zinmag Remedy template is originally a wordpress theme or template and converted by Falcon Hive into a blogger/blogspot template. This template is great and comes with hundreds of features. You can read more about the the template in my post The Zinmag Remedy Blogger Template.

    What are the differences of the Zinmag Remedy 2.0 to Zinmag Remedy? The 2.0 version is much easier to customize. Falcon Hive who converted the template said that they fixed every possible SEO issue and improved the ‘h tag’ of the template. They also rearrange the code to make its structure more completely similar to the standard template, the Minima’s structure.

    The 2.0 version is 99% widgetized or customized. Like I said, the old version needs you to have HTML knowledge to setup and that's often causes unpredictable error. But for the 2.0 version it is "99% widgetized" all the part from the top navigation bar to the bottom tabber section. So as Falcon Hive said: "you can now wipe out all your worries and just customize Remedy in Page Element section!"

    The CSS and template structure of 2.0 version has improved. The new modified template’s CSS code fixes some issues like misaligned image in the ads space on the main page. Modifications on JavaScript/HTML gadget have made also to make customization faster and easier. And lastly, a new layout view is been made. See more to Zinmag Remedy 2.0 page.

    So what is the unusual difference to the two version? See the images below. (Click the images to enlarge)
    New Version:

    Zinmag Remedy 2.0
    Old Version:

    Zinmag Remedy old

    Did you see the unusual differences? You notice it in the ‘Carousal Panel’. The new version uses a scrolling image navigation and the old version uses the sliding image navigation. I have notice this unusual thing when I installed the new version on my new blog. Thinking it might be an upload error, I try to upload the new version many times but it don't resolve the problem. So I end up uploading the old one. See my next post for the solution to the problem of 2.0 version ‘Carousal Panel’.

    Update:

    The differences of two templates here only happens if you use the default hosted javascript files which is been disabled by the host. For best results upload all javascript files located in the js folder to your hosting account. If don't have hosting account you can try hosting it here. It is free to host and to register.

    Mini-Hotrod 3 Column Blogger Template

    August 4, 2009 1 comments
    Hotrod is originally a 2 column Wordpress theme created by Jinsona designs and converted into blogger by Templates Novo Blogger. I saw this template in Templates-blogger.com. But as I experienced the converted blogger version has some problems. It seems OK in the homepage, but if you browse to the individual post, the content of your post is not appearing. It also happens on archive page and label page.

    You see, this template is very cool and hot because of the red sport car viewed on its header. Because of its coolness I tried to fix the problems. But as you can I really love 3 column templates, specially the Minibox 3 Column Modified, and this template is a 2 column version. So instead of fixing the problem I thought it is easier if I just combine it to my favorite 3 column template.

    As the result the Mini-Hotrod 3 Column Blogger Template was born. This template is a combination of the Minibox 3 Column Modified and the Hotrod. It has the same features of Minibox 3 Column Modified and the coolness and hotness of Hotrod.

    Mini-Hotrod 3 Column Blogger TemplateFeatures:
    • NavBar has been remove
    • Google Translate Widgets
    • Live Traffic Feed Widgets
    • No Right Click Widgets
    • "Post Title | Blog Title" SEO Trick
    • "Read more posts filed under + Labels Name" Widget tags
    • "Title" Widget tags
    • "Related Post" below each of your posts
    You can see the demo here. Download it here.

    Minibox 3 Column Modified Blogger Template

    July 28, 2009 2 comments
    Minibox is a free 3 column blogger template created by James William that was heavily based on the popular Minima template. This template is an XML based. The code uses here is very similar to the structure of the Minima template. It is almost identical in variable names and section identifiers so that people can be familiar with it to modifying the Minibox template code. Minibox is completely compatible with Blogger's drag-and-drop layout manager.

    I love this template but as I see and experience this template has three major problems. So I try to correct those errors and made good solutions for that. And it comes out so great. I also added some features to this template. But if you don't want the added features just remove it in the Layout Manager. So enjoy.

    Minibox 3 Column Modified Blogger Template
    Problems that Minibox 3 Column has:
    1. You can't upload it, if you try to upload it some errors occured.
    2. You can't add gadget between the header and the templates body.
    3. The codes is not full coded.
    Minibox 3 Column Modified capable with:
    1. You can upload it directly.
    2. You can add gadgets between the headers and the templates body.
    3. The code is fully coded for modification.
    Added Features:
    1. Navbar has been remove
    2. Google Translate Widgets
    3. Live Traffic Feed Widgets
    4. No Right Click Widgets
    5. "Post Title | Blog Title" SEO Trick. (Click the image to enlarge it)
    6. Minibox 3 Column Modified Blogger Template
    7. "Read more posts filed under + Labels Name" Widget tags. (Click the image to enlarge it)
    8. Minibox 3 Column Modified Blogger Template
    9. "Blog Title" Widget tag. (Click the image to enlarge it)
    10. Minibox 3 Column Modified Blogger Template
    11. Show a "Related Posts" below each of your posts. Related Posts will only appear in your single posts page. It will not appear in your homepage. (Click the image to enlarge it)
    12. Minibox 3 Column Modified Blogger Template

    You can download the Minibox 3 Column Modified here.

    No Right Click for Blogger/Blogspot

    July 24, 2009 2 comments
    How to disable right click on Blogger(blogspot)? It is easy to disable the right click option in blogger, we just need to add a javascript code to our page.

    Why we do this? We all knew that if we right click to the images and articles (highlighted) in our pages a menu will pop out for many options like copying the links, to save, to open a link to a new tab or window and etc. We want to disable this option to prevent people for copying our blog posts, articles, images and other kind of information owned by you.

    How to setup the No Right Click to our blog? Simply, just follow the steps below:
    1. Download the script here and extract the file.
    2. Log in to your account and go to your blogs' Layout. In my blog it looks like this (click to the images to enlarge it):
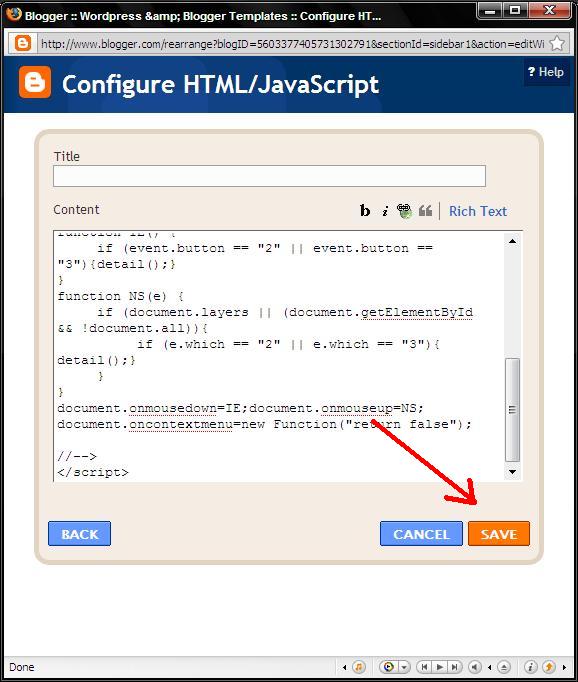
    3. At the sidebar click Add a Gadget and select the HTML/JavaScript gadget by clicking the plus sign.
    4. Now open your extracted file that you downloaded, the no-right-click-1.txt. Copy the codes there and paste it to your added gadget, just like the picture below:
    5. and Save, and your done.
    Now browse to your blogs' home page and test if our codes is working. If it is not working as the way you enter the code, post your comment here and I will assist you.

    The Minibox 3 Column Blogger Template

    July 13, 2009 Leave a comment
    Minibox is a free 3 column blogger template heavily based on the popular Minima template. This is an XML based Blogger template for newer Blogspot blogs. The code uses very similar structure and almost identical variable names and section identifiers so that people familiar with modifying the Minima template shouldn't have much trouble modifying the Minibox template code.

    Minibox is completely compatible with Blogger's drag-and-drop layout manager. The original 2 column version of Minima was written by Douglas Bowman of stopdesign.com. Here's a quote from his website:
    The goal was to provide a fresh selection of well-designed and efficiently-coded, standards-based templates that provided solid yet flexible starting points for anyone to use as a design for their new or existing blog.
    Minibox 3 Column Blogger Template
    Download it here. If you're having trouble downloading the template try right-clicking and choosing "Save As". If you're still having trouble post a comment.

    This is the first release. If anyone notices any glitches please post a comment and I will try to resolve ASAP.

    Alternate colour combinations or slight variations are also likely to follow. If there are any requests, please post a comment and I will take requests into consideration.

    The Zinmag Remedy Blogger Template

    February 4, 2009 Leave a comment
    This free professional magazine template comes with hundreds of features, so it need skills for customization. Here is the demo for the template before customization (click here) and here after customization (click here).

    This template is compatible with Internet Explorer 8, Firefox RC3, Opera 9.6, and Google Chrome 0.3.154.9. This template has 4 columns, gadget ready, 2 navigation bars ready, search box ready, 3 feature content boxes, 2 rss icons ready, 3 ads blocks ready, video space ready, footer gadget ready, and the amazing thing is the great top navigation bar that you must check it out.

    The Zinmag Remedy Blogger Template

    You can download it here in a zipped file. Extract it and read the instruction file called installing-zinmag-remedy-Help.txt that will help you to set up the First Header Navigation Bar, the Second Navigation Bar, the ‘Feature Slide Carousal’ on the top of the main page, the ‘Featured Content’ on the top of the main page, the Main Page’s Ads Space, the ‘Video of the day’, the Tabber, the ‘Highlight Reel/ Featured Content’ on the top of the sidebar, the 125×125 Ads, the Email Subscribe button, the Content page’s Ads Space and how to hide article’s content on the main page.

    If you want some more information about this template visit here.

    The WP-Polaroid Blogger Template

    January 26, 2009 Leave a comment
    eBlog Templates is very pleased to announce the release of WP-Polaroid for Blogger! This template is full of cool features and took a long time to convert from the original WordPress theme (by Adii) so the author hopes to appreciate it.

    This template is very popular with WordPress users and for good reason. It’s stylish, nicely laid out, and very web 2.0. Not only that, it’s also got the following sidebar page elements built in. It just need to configure in order for them to work properly.

    The WP-Polaroid Blogger Template
    Page elements that needs to configuration:
    • Flickr photo slideshow area where you can display your personal or random pictures
    • Mybloglog recent blog readers section (you’ll need a mybloglog account)
    • Three 125×125 ad spots to help you make money from your blog
    • Recent posts list
    • Recent comments list
    • Two sidebar link lists
    • Page navigation links in the header
    • RSS feeds for your posts and comments
    • A header spot to display your personal photo
    Make sure to read through all the steps (here) in order for the template to function on your blog properly. It's free to download, just register. Click here to download.